Mastering the subtle art of lighting techniques for the human form is arguably one of the most powerful skills a visual artist can cultivate. It’s the difference between a flat, forgettable image and one that breathes with life, depth, and emotion. Think of light not just as illumination, but as a sculptor's chisel, shaping curves, defining muscles, and revealing the very essence of your subject.
This isn't about simply making things visible; it's about telling a story, evoking a mood, and highlighting the unique beauty and complexity of the human body. Whether you're a photographer, a filmmaker, a stage designer, or simply someone looking to understand visual communication better, truly harnessing light will transform your work.
At a Glance: Key Takeaways for Sculpting with Light
- Direction is Everything: Where light hits your subject dictates shadows, depth, and emotional impact.
- Intensity Shapes Detail: Control contrast to either emphasize every texture or create a softer, more ethereal look.
- Color Sets the Mood: Warm or cool tones dramatically influence the viewer's perception and feeling.
- Shadows are Your Allies: Use them deliberately to add dimension, mystery, and emphasize contours.
- Texture Adds Realism: Strategic lighting can make skin, fabric, and hair leap off the canvas.
- Practice Makes Perfect: Experimentation is crucial to developing an intuitive understanding of light.
The Unseen Power: Why Light is Your Ultimate Sculptor
Before any camera clicks, any stage curtain rises, or any brushstroke is applied, light has already begun its work. It's the silent architect, defining every line, curve, and plane of the human form. Without deliberate lighting, even the most compelling pose or beautiful subject can appear two-dimensional and uninspired.
Imagine a world without shadows – just flat, even illumination. Our brains rely on those subtle shifts from light to dark to perceive depth and form. When we master these lighting techniques for the human form, we're not just brightening a scene; we're actively creating the illusion of three dimensions, drawing the viewer's eye, and guiding their emotional response. It’s about transforming a body into a canvas, and light into paint.
Building Your Lighting Arsenal: Fundamental Principles
To truly sculpt with light, you need to understand its core properties. Think of these as your primary tools, each with a distinct purpose in shaping the human figure.
Direction: The Angle that Defines
Where light originates relative to your subject is perhaps the most impactful decision you'll make. Each angle offers a radically different effect:
- Front Lighting: The Flattener. When light comes directly from the camera's position, it minimizes shadows and wraps around the form evenly. This can be great for evenly lit commercial product shots, but for the human form, it often leads to a "flat" appearance, reducing depth and making the subject look less dimensional. It can, however, be used strategically to soften skin and reduce wrinkles if that's the desired effect.
- Side Lighting: The Revealer. This is where the magic begins for sculpting. Light hitting the subject from the side (90 degrees to the camera axis) creates strong, pronounced shadows on the opposite side. These shadows accentuate textures, highlight muscle definition, and dramatically enhance the perceived depth of the form. Side lighting is excellent for emphasizing contours, like the curve of a back or the definition of an arm.
- Backlighting: The Silhouette Maker. Positioning the light source directly behind your subject emphasizes their outline, often plunging the front into shadow or creating a striking silhouette. This technique is powerful for creating drama, mystery, or for making your subject stand out against a brighter background. It can also create a beautiful "rim light" effect, where a thin line of light traces the edges of the form, separating it from the background and adding an ethereal glow.
- Top Lighting: The Dramatic Spotlight. Light coming from directly above can create deep shadows in eye sockets and under the nose and chin, adding a dramatic, often solemn or mysterious quality. It emphasizes the planes of the forehead and cheekbones.
- Bottom Lighting: The Unsettling Glow. Light from below is less common for natural portrayal but can be used for highly dramatic, even unsettling effects, casting shadows upwards and distorting familiar features. Think of classic horror movie lighting.
Intensity: The Language of Contrast
Intensity refers to the brightness of your light source. But more importantly, it's about the quality of that light – specifically, whether it's hard or soft.
- Hard Light (High Intensity): Bold and Defined. Produced by a small, focused light source (like the sun on a clear day or a bare flash), hard light creates sharp, distinct shadows and high contrast. This quality emphasizes textures, lines, and contours with unforgiving clarity. It’s ideal when you want to highlight rugged features, strong musculature, or dramatic expressions.
- Soft Light (Lower Intensity): Gentle and Graceful. Originating from a large, diffused light source (like an overcast sky, a large window, or a softbox), soft light produces subtle, gradual transitions between light and shadow. It minimizes harsh lines, softens skin textures, and creates a more flattering, often ethereal look. Soft light is perfect for conveying vulnerability, tranquility, or classical beauty, where smooth transitions are paramount.
The relationship between light intensity and the size of the light source (relative to the subject) is key. A small light source creates hard light, regardless of its overall brightness. A large light source creates soft light.
Color Temperature: The Emotional Palette
Measured in Kelvin (K), color temperature describes the warmth or coolness of light, profoundly impacting the mood and atmosphere of your image.
- Warm Light (Lower K, e.g., 2700K-3000K): Inviting and Intimate. Think of candlelight, a sunset, or a cozy incandescent bulb. Warm tones evoke feelings of comfort, intimacy, passion, and nostalgia. For the human form, it can create a soft, romantic glow, enhancing skin tones with a golden hue.
- Cool Light (Higher K, e.g., 5000K-6500K): Crisp and Clinical. This is the light of a clear midday sky, fluorescent bulbs, or modern LEDs. Cool tones can suggest sterility, efficiency, or a stark, dramatic mood. When applied to the human form, it can emphasize coolness, isolation, or a statuesque quality, often making skin tones appear more pale or blue.
- Neutral Light (around 3200K-4500K): Balanced and True. Studio strobes are often balanced to mimic daylight (around 5500K) to render colors accurately. However, experimenting with warmer or cooler tones can dramatically alter the emotional impact of your shot without changing anything else.
Understanding color theory for artists extends beyond temperature, influencing how we perceive form and emotion through hues.
Sculpting Masterclass: Techniques to Enhance Form
Once you grasp the fundamentals, you can combine them to actively sculpt the human form. This is where artistic vision truly comes into play.
The Dance of Light and Shadow: Your Secret Weapon
Shadows are not simply the absence of light; they are powerful tools for defining shape and adding narrative. Ignoring them is like trying to draw a figure with only outlines.
- Attached Shadows: These are the shadows that fall on the subject itself, caused by its own contours blocking light. The subtle attached shadow under a cheekbone, along a bicep, or in the hollow of a collarbone is what gives the form its three-dimensionality. By strategically positioning your light, you can deepen or soften these attached shadows to emphasize or deemphasize certain features.
- Cast Shadows: These are shadows projected by the subject onto a surface (like the background or another part of the body). A hand casting a shadow onto a torso, or a profile casting a shadow onto a wall, adds depth, context, and can even create abstract patterns that enhance the composition.
Learning to control the transition from highlight to shadow (the "fall-off") is crucial. Fast fall-off (sharp transition) creates drama; slow fall-off (gradual transition) creates softness.
Accentuating Texture: Revealing the Skin's Story
The human form is rich with texture – skin, hair, fabric, even the subtle undulations of muscle. Light can make these textures sing.
- Grazing Light: By positioning a light source at a very shallow, almost parallel angle to the surface of the skin, you can make even the finest textures incredibly prominent. This technique literally "grazes" the surface, creating tiny highlights and shadows that reveal every pore, wrinkle, and strand of hair. It's fantastic for dramatic close-ups of skin or for emphasizing the raw, unpolished truth of a subject.
- Specular Lighting: Specular highlights are the bright, reflective spots on glossy or moist surfaces. On the human form, these appear on moist lips, glistening eyes, or slightly oiled skin. These highlights emphasize the sheen and texture of these areas, making them appear luminous and alive. Strategic use of specular highlights can draw attention to key features and add a sense of vitality.
Contrast Control: The Art of Detail and Drama
The interplay between the brightest highlights and the deepest shadows is known as contrast. Mastering contrast is essential for guiding the viewer's eye and conveying emotion.
- High Contrast: Bold and Expressive. High contrast lighting features bright highlights and deep, dark shadows with minimal mid-tones. This creates a strong, dramatic look, emphasizing contours and textures, but it risks losing detail in both the brightest and darkest areas. It’s effective for powerful, emotive imagery.
- Low Contrast: Subtle and Nuanced. Low contrast lighting has a narrower range between highlights and shadows, with plenty of mid-tones. This preserves detail across the entire image and results in a softer, more ethereal, or muted appearance. It's often used for delicate, introspective, or melancholic moods.
For photography, a contrast ratio of 1000:1 is often considered optimal for a balanced image, but artistic intent can push these boundaries. The key is to choose the contrast level that best serves your vision for the human form.
Applying Your Tools: Mastering the Human Canvas
Now that you understand the building blocks, let's look at how these principles translate into real-world applications for the human form.
Portraiture & Studio Photography: Precision and Purpose
In a controlled studio environment, you have absolute power over every light. This allows for incredibly precise sculpting.
- Classic Lighting Setups: These time-tested patterns leverage direction and intensity to flatter or dramatize the human face and form.
- Rembrandt Lighting: Characterized by a small, inverted triangle of light on the shadowed cheek, this uses a single, slightly off-axis light source. It creates a mood of intimacy and drama, popular in fine art portraiture.
- Butterfly Lighting (Paramount Lighting): A main light placed high and directly in front of the subject creates a butterfly-shaped shadow directly under the nose. This is highly flattering for many faces, emphasizing cheekbones and creating a glamorous look.
- Split Lighting: A single light positioned to one side of the subject, illuminating half the face and leaving the other half in shadow. It creates a strong, dramatic, and often intense mood, emphasizing symmetry and division.
- Loop Lighting: Similar to Rembrandt but with the shadow of the nose creating a small loop that doesn't connect to the cheek shadow. It’s slightly softer than Rembrandt but still maintains dimension.
- Using Modifiers: These tools shape and control your light.
- Softboxes and Umbrellas: Diffuse hard light into soft, flattering illumination. The larger the modifier, the softer the light.
- Grids (Honeycombs): Attach to softboxes or reflectors to narrow the beam of light, preventing spill and adding directional control.
- Reflectors: Bounce light back onto the subject, filling in shadows and reducing contrast. Silver provides more punch, gold adds warmth, and white offers a softer fill.
- Flags/Gels: Flags block light to create shadows or control spill; gels add color to the light.
When mastering portrait photography, understanding these modifiers is as crucial as understanding light direction.
Fine Art & Conceptual Photography: Emotion and Narrative
Here, the human body often becomes a symbolic element, an expressive canvas for deeper meaning. Lighting becomes a key storyteller.
- Composition for Impact: Beyond just lighting, how you frame the body, the use of negative space, and the balance of elements all contribute to the emotional weight. Light helps guide the eye through these compositional choices. A strong side light on a curved back can emphasize both vulnerability and strength, for example. Consider the power of negative space in your compositions.
- Posing and Gesture: Collaboration with your subject is paramount. A subtle shift in a hand position or a tilt of the head, combined with specific lighting, can dramatically alter the narrative. A downcast gaze under dramatic top lighting can evoke profound introspection.
- Black and White vs. Color: For fine art, the choice is powerful. Black and white photography inherently emphasizes form, texture, and contrast, making light and shadow the primary visual elements. Color, conversely, adds another layer of emotional and symbolic depth through hues and tones. For conceptual work, sometimes stripping away color allows the pure sculpture of light to shine.
- Storytelling with Props and Symbolism: Props like fabric, masks, or natural elements (water, smoke) can be enhanced by specific lighting to add layers of meaning. A backlit veil can symbolize mystery or purity, while harsh, direct light on a mask can convey starkness or concealment.
- Ethical Considerations and Consent: Especially when working with the human form, ethical practices are non-negotiable. Open communication, respecting boundaries, ensuring comfort, and explicit consent are foundational. The way you light a subject can also influence how they are perceived – empowered or vulnerable – so be mindful of the message you're sending. This aligns with broader ethical considerations in art that every artist should embrace.
Stage & Performance Lighting: Dynamic Storytelling
On stage, lighting isn't static; it evolves with the narrative, transforming spaces and emotions. For human performers, it’s about shaping their presence.
- Highlighting Movement: Moving lights can follow a dancer, emphasizing their motion and dynamism. Harder light can make a solo performer pop out from a darkened background.
- Creating Atmosphere: Warm washes can evoke a romantic scene, while stark, cool blues can suggest loneliness or danger. Light helps define the psychological state of characters.
- Sculpting Performers: Backlights separate actors from scenery, side lights define their physical presence, and overhead specials can pinpoint specific gestures or expressions, almost like a living sculpture.
Beyond the Basics: Advanced Considerations for the Human Form
As you grow in skill, you'll naturally look to more complex scenarios.
Natural Light: Harnessing the Sun's Artistry
The sun is the original light source, and its qualities change constantly. Mastering natural light for the human form means understanding these shifts.
- Window Light: A large window acts like a giant softbox, providing beautiful, directional soft light. Position your subject facing the window for soft, even light, or side-on for more dramatic shadows.
- Golden Hour: The hour after sunrise and before sunset offers warm, soft, directional light perfect for ethereal portraits and cinematic moods. The low angle of the sun emphasizes form and creates long, beautiful shadows.
- Blue Hour: The period just after sunset or before sunrise, when the sky turns a deep, rich blue. It offers cool, soft light that can create a serene, mystical, or melancholic feel for the human form.
- Open Shade: On a sunny day, moving your subject into open shade (like under a large tree or building overhang) provides soft, even light without harsh shadows, ideal for flattering portraits.
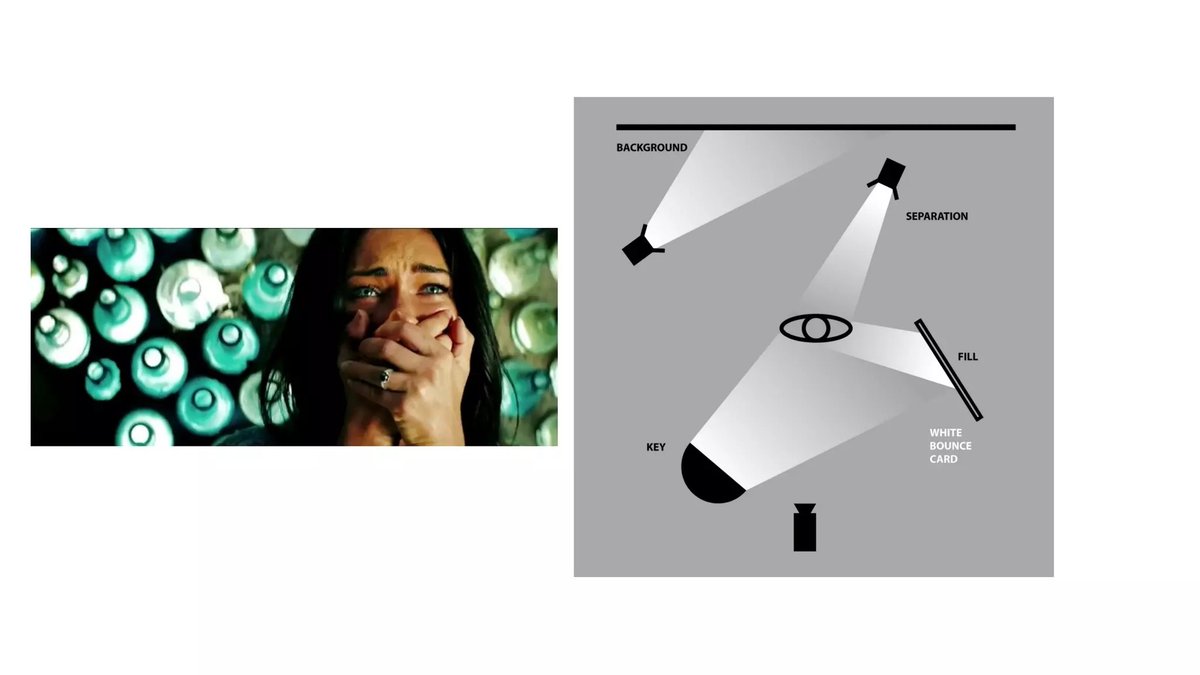
Multi-Light Setups: Orchestrating Complexity
While a single light can be powerful, combining multiple lights allows for incredible control and dimension.
- Key Light: Your main, dominant light source, typically providing the most illumination and shaping.
- Fill Light: A softer, less intense light (often a reflector or a second light at lower power) used to soften shadows created by the key light, reducing contrast.
- Hair Light (Kicker/Rim Light): A light positioned behind and above the subject, often with a grid, to create a highlight on the hair or a rim of light around the shoulders, separating the subject from the background.
- Background Light: Used to illuminate the background independently, adding depth or creating specific effects.
Experimenting with two, three, or even more lights allows for nuanced control over every aspect of the human form, from the highlights on the cheekbones to the subtle sheen on the hair. Exploring advanced studio lighting techniques will unlock new levels of creative control.
Common Pitfalls and How to Avoid Them
Even seasoned pros make mistakes. Being aware of these common issues can save you time and frustration.
- Flat Lighting: Often caused by direct on-camera flash or too much omnidirectional light. Solution: Use off-camera light, add direction, or use modifiers to create softer, more intentional shadows.
- Harsh Shadows: Resulting from small, undiffused light sources. Solution: Use larger modifiers (softboxes, umbrellas), move the light further away (which makes it relatively larger), or choose a softer natural light source.
- Blown-Out Highlights/Crushed Shadows: Losing detail in the brightest or darkest areas. Solution: Pay attention to your light meter, use fill light to lift shadows, or use flags to control highlights. Sometimes, it’s a deliberate artistic choice, but know when it’s happening.
- Unflattering Shadows: Shadows cast in awkward places (e.g., a "beard" shadow under the chin that disconnects from the jawline). Solution: Adjust light angle, height, or distance. A slight repositioning of the subject or light can make all the difference.
Your Path to Lighting Mastery
Learning lighting techniques for the human form is a journey, not a destination. It’s about cultivating an eye for how light interacts with three-dimensional objects and how those interactions influence perception and emotion. Start simple, master one light, and then gradually introduce complexity.
Observe light everywhere – the way it falls through a window, the glow of a streetlamp, the highlights on a stranger's face. Begin to deconstruct it: Where is it coming from? Is it hard or soft? What color is it? How are the shadows behaving? This constant observation will build your intuition, allowing you to quickly assess a scene and envision how you want to shape it.
Experiment fearlessly. Push the boundaries. Some of your most interesting discoveries will come from "mistakes" or unexpected results. The human form is an infinitely fascinating subject, and with light as your guide, you have an endless palette to explore its beauty, strength, and vulnerability.
For more in-depth exploration of visual artistry and creative techniques, check out All things Bare Back Studios. Keep experimenting, keep observing, and keep sculpting with light.